How to Make Someone a Mod on Discord: Complete Guide
Moderators hold the backbone of any Discord community. They keep chats friendly, topics on track, and trolls at bay. Yet few pay attention to the role hierarchy that determines who can do what. How can you ensure a new moderator slot has the right permissions without breaking your server’s balance?
By diving into Discord’s role system and understanding how permission tiers stack, you can make informed decisions when you assign moderator duties. This knowledge not only prevents unwanted permission leaks but also ensures your community runs smoothly. Let’s explore how mastering these details will help you elevate trusted members to moderator status with confidence.
Understanding Discord Roles
Think of roles as badges you assign to members. They define what actions people can take, from reading channels to managing messages. Every permission lands on a specific role, so for moderators you will bundle the right set. Creating clear labels helps you stay organized.
If your server theme revolves around gaming, you might enjoy browsing unique cool nicknames for gamers to find fun role names. A memorable name like “Chat Sheriff” sets expectations. It also helps members know who to contact when issues pop up.
Understanding that roles stack is vital. When someone has multiple roles, they inherit all permissions. That can lead to unexpected access if higher-level roles share broad rights. Always verify the top role in the list controls the key actions for a moderator.
Start by studying Discord’s default roles, like Admin and Moderator. Clone these templates or build one from scratch. Consider which channels you want your moderators to access. Reviewing the tooltips under each permission checkbox prevents surprises when you go live.
Organizing roles into color groups also streamlines assignment. You might group all moderation roles under red to distinguish them from fun or event staff roles. Visual cues help both people and bots recognize the hierarchy at a glance.
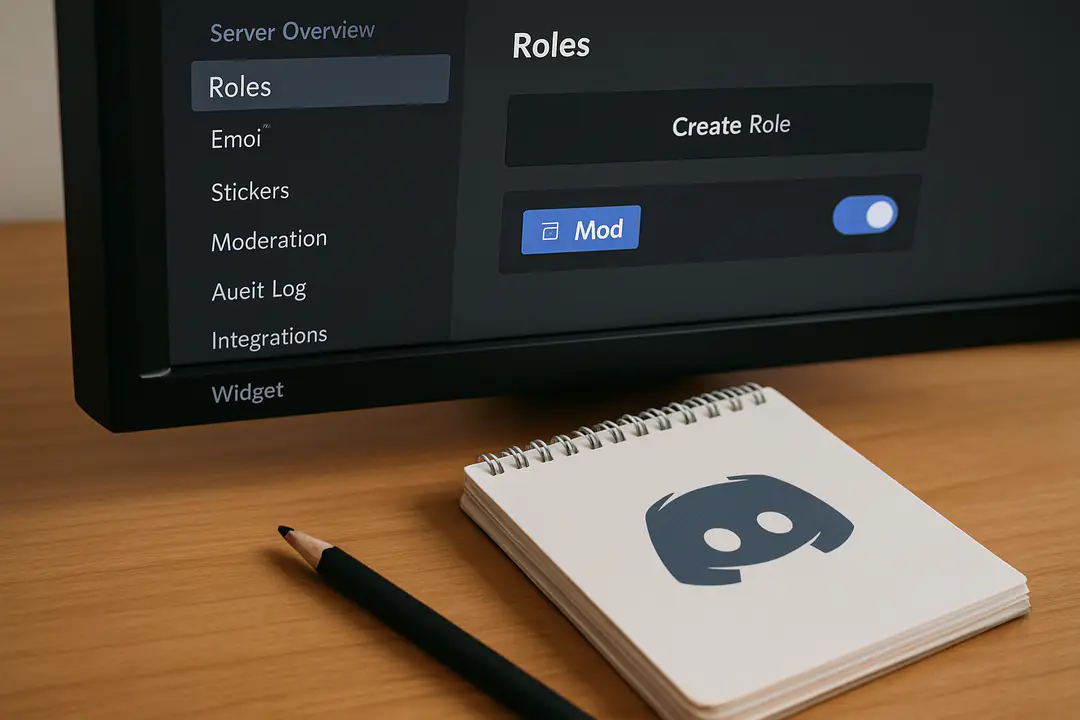
Setting Up Server Roles
Once you know what a moderator role requires, head into Server Settings and open Roles. Click the plus button to create a new role. Give it a clear name, like “Moderator,” and pick a visible color.
Scroll through the permission list and toggle on the ones you decided on. If you want moderators to mute or kick, check those boxes. Avoid giving admin-level permissions unless you fully trust the member.
For a themed server—say one about pets—you could add playful touches. Tie role names to fluffy dog names for a light tone. A name like “Fluffy Guard” keeps things fun while signaling authority.
Save your new role and return to the Member List. Right-click a member’s name, go to Roles, and select your newly created Moderator role. The change takes effect instantly, and your team member will see updated permissions the next time they refresh Discord.
Remember to test the role in a private channel. Log in with a test account or ask the new mod to confirm they can manage messages without gaining unintended power. A quick check here saves headaches later.
Assigning Moderator Permissions
Choosing the right permissions is key. Too many and your mod can reshape channels; too few and they can’t help. Follow these steps to strike the right balance:
- Open Server Settings and select Roles.
- Click your Moderator role.
- Under General Permissions, enable: Manage Messages, Kick Members, Mute Members.
- Under Text Permissions, enable: Read Message History, Manage Emojis.
- Under Voice Permissions, enable: Mute Members, Deafen Members.
- Leave Administrator off to prevent full control.
- Save changes and test in a sandbox channel.
This checklist guides you through common needs. Feel free to adjust based on your community’s style. If voice chats are critical, you might add Move Members or Connect permissions. If emojis matter, give Manage Emojis below.
Once set, check the Audit Log to watch for any misplaced toggles. It logs who changed what and when. Reviewing it monthly helps catch a permission creep before it becomes an issue.
Managing Role Hierarchy
Role hierarchy decides who can manage which roles. In Server Settings, drag your Moderator role below Admin but above default roles. This order limits a mod from editing roles higher than theirs.
If you place Moderator at the bottom, they lose many powers. Too high and they gain unintended access to roles you wanted to keep private. A middle spot often works best.
You can also group similar roles. For example, place event staff roles just below mods so they can handle giveaways but not server settings. Visual grouping reduces confusion during fast decisions.
Remember: Roles inherit permissions from their position. If a higher role has Manage Channels on, your mod will also have that right even if you untick it below. Always double-check by testing from a member account.
For large servers, consider splitting moderation tasks. Create a “Junior Mod” with basic rights and a “Senior Mod” with more powers. Use the hierarchy to keep them distinct and clear.
Best Practices for Mods
Clear rules and training keep moderators effective. Here are some tried-and-true tips:
- Hold a quick onboarding session to review server rules.
- Create written guides in a private channel for reference.
- Rotate duty schedules to avoid burnout.
- Encourage open communication in a mod-only chat.
- Use consistent naming—add a tag like [Mod] to usernames.
- Set up auto-moderation bots for basic filters.
- Review logs weekly to catch recurring issues early.
These steps build a strong team culture. Trained mods know what to do when conflicts arise. Written guides cut down decision time. And regular check-ins ensure everyone stays on the same page.
Assigning a small group of trusted veterans to mentor new moderators also helps. Pair them up for the first week so new mods learn the ropes without feeling lost.
Troubleshooting Common Issues
Even with planning, problems happen. Here’s how to fix the most frequent issues:
If a mod can’t perform actions, re-check their role position. They might be too low in the hierarchy. Move them up one level and test again.
If they gain too much power, compare all the roles they hold. A higher role might have slipped in a broad permission. Temporarily disable that role to isolate the issue.
When Audit Logs don’t show changes, ensure the mod has View Audit Log permission. Add it under General Permissions for them to see who makes edits.
If bots conflict with moderation, adjust bot permissions. Give bots a role above mods for key actions, or remove rights where overlap causes errors.
Finally, educate members on appeals. Mistakes can happen—set up a private channel where mods can review or reverse actions, keeping transparent logs for accountability.
Conclusion
Promoting someone to moderator on Discord is more than flipping a switch. It involves careful planning of roles, permissions, and hierarchy. By understanding how roles stack, testing settings, and following best practices, you ensure your community stays safe and vibrant.
Transparent processes, clear guidelines, and regular reviews prevent permission creep and confusion. When moderators feel supported and trained, they handle conflicts swiftly and maintain order without drama. Now, armed with this guide, you can confidently elevate trusted members to keep your server running smoothly. Start setting up your moderation team today and watch your community thrive.